The home and garden are dedicated to improving and beautifying living spaces inside and out. This niche contains home essentials, lawn care and landscaping advice, and gardening techniques. It aims to help individuals create attractive, functional, and personalized environments, enhancing their homes and outdoor areas. Whether maintaining a lush lawn, cultivating a garden, or embarking on a DIY project, this niche provides valuable insights and inspiration to elevate your living spaces.
How To Position Grow Lights For Healthy Indoor Seedlings: Easy Guide
Position grow lights directly above your seedlings, close enough to provide strong, even light without overheating or stressing the leaves. Start with the distance recommended by the light manufacturer, keep the lights level with the tops of the plants, and adjust them as the seedlings grow. Most seedlings need about 12 to 16 hours of light each day, followed by a dark period.
Across the United States, gardeners start vegetable seeds indoors to get a head start on spring. In colder states, seed trays may sit on basement shelves or in spare rooms while snow covers the garden. In warmer areas, gardeners may start tomatoes, peppers, herbs, and flowers indoors before moving them outside. A sunny window can help, but it often cannot provide enough light for compact, sturdy seedlings.
Grow lights give young plants a more dependable source of light. Still, owning a bright lamp is only part of the job. Its height, angle, coverage, and daily schedule all affect how seedlings grow. A light that hangs too high can leave plants thin and weak, while a light placed too close may cause stress if its output is too strong or it produces too much heat.
The best setup does not need to be complex or expensive. You can use a shelf, a timer, and an adjustable LED grow light to create a simple indoor growing area. The key is to watch how your seedlings respond rather than rely on one distance for every lamp and every plant. This guide explains how to set up your lights, adjust them as plants grow, and spot problems before they affect your young garden.
Source: growagoodlife.com
Why Grow Light Position Matters for Indoor Seedlings
Grow light position affects how much usable light reaches the leaves and how evenly plants grow. Seedlings use light to make sugars through photosynthesis. Those sugars support new leaves, stems, and roots. If young plants receive too little light, they may stretch toward the source and develop long, weak stems.
Outdoor sunlight changes in strength and angle throughout the day. Indoor lighting can be more consistent, but only when the fixture is placed well. A lamp may look bright to your eyes while providing too little light for healthy growth. Human vision and plant light needs are not the same.
The goal is to give each seedling enough light without creating excessive intensity or heat. Even coverage matters because plants at the edge of a tray may receive much less light than those directly below the center of a fixture. A good setup helps seedlings grow at a similar pace and makes watering, feeding, and transplanting easier.
Source: caribouseedcompany.com
Stronger stems
Adequate light helps seedlings develop compact growth instead of stretching toward a distant lamp.
More even growth
A centered fixture helps seedlings across the tray receive similar amounts of light.
Better control
A fixed light and timer make it easier to maintain a repeatable daily routine.
What Happens When Lights Are Too Far Away?
When light at leaf level is too weak, seedlings may develop long stems, large gaps between leaves, and a tendency to lean toward the lamp. This is called stretching or etiolation. It is common when seedlings grow on a windowsill or under a fixture that hangs too high.
Move the light closer in small steps, provided the manufacturer allows it. Then watch the newest growth over the next several days. Existing stretched stems will not always become short again, but stronger new growth can improve the plant's overall shape.
Watch the stems
Long, thin stems and seedlings leaning toward the light can indicate inadequate light, though crowding and warm temperatures can also contribute.
Check the whole tray
If only seedlings near the edges stretch, the fixture may not cover the full growing area evenly.
What Happens When Lights Are Too Close?
A light that is too intense for the seedlings may cause pale patches, bleached leaves, curled edges, or other signs of stress. Heat from a fixture can add to the problem, but some efficient LED lights produce little warmth while still delivering intense light. For this reason, a cool lamp is not automatically safe to place right against the leaves.
If you notice sudden leaf damage after lowering the fixture, raise it to the previous distance and review the manufacturer's guidance. Check whether the lamp has a dimmer. Lowering light intensity can be a better option than raising the lamp when you need to maintain even coverage across a wide tray.
Look for bleaching
Very pale areas on leaves can signal excessive light, although nutrient problems and other stresses can cause similar symptoms.
Check leaf temperature
Warm leaves, curling, or dry edges deserve attention, but use the full pattern of symptoms rather than one sign alone.
How Far Should Grow Lights Be From Seedlings?
There is no single distance that works for every grow light. The right gap depends on the lamp's output, beam angle, fixture size, dimming setting, and the amount of light your seedlings need. A small desk lamp with a low-output bulb may need to sit closer than a powerful LED panel, but the stronger panel may cover a larger area.
Start with the distance in the manufacturer's instructions for seedlings or young plants. If the guide gives a range, use the more conservative end for delicate new growth and observe how plants respond. Adjust the height or intensity gradually rather than making large changes from day to day.
As a rough starting point only, some low-output LED grow bulbs may work about 6 to 12 inches above the leaves, while some larger LED fixtures may need a gap of 12 to 24 inches or more. These are not universal recommendations. A powerful fixture may damage plants at the shorter distance, and a weak lamp may still provide too little light at the longer one.
Measure from the light-emitting surface to the top leaves, not from the fixture to the soil or the rim of the tray. This is especially important once seedlings have grown at different rates. If the plants are uneven in height, consider raising or separating taller plants rather than letting them crowd the light.
Source: treecarezone.com
Check the fixture instructions
Use the recommended seedling distance and any stated minimum clearance as your first guide.
Measure from the canopy
The canopy is the upper layer of leaves. Measure the actual gap between those leaves and the light.
Adjust in small steps
Change the distance gradually and check for stretching, bleaching, curling, and uneven growth.
Use a dimmer if available
A dimmer can reduce intensity without forcing you to move the fixture far from the growing area.
Distance Is Not the Same as Light Intensity
The amount of light reaching a leaf depends on the lamp and the distance between the lamp and the plant. For a small light source, intensity often drops quickly as the distance increases. Real grow lights differ in shape, reflector design, beam spread, and output, so a simple distance rule cannot predict every setup.
Some manufacturers provide photosynthetic photon flux density, or PPFD, measurements. PPFD describes the amount of photosynthetically active light reaching a square meter each second, measured in micromoles per square meter per second. If the manufacturer provides a PPFD map at different hanging heights, use the values that match your fixture and growing area.
A phone light-meter app can help you compare bright and dim areas, but ordinary phone sensors do not measure plant-useful light as accurately as a suitable plant-light meter. Lux measures light based on human vision, so it can be misleading when comparing different light colors. Treat app readings as rough comparisons rather than exact proof that your seedlings receive enough light.
PPFD
Useful for understanding the light reaching the leaves when the fixture manufacturer provides reliable measurements.
Lux
Measures brightness as perceived by human eyes and may not represent plant-useful light equally across different spectra.
Daily light integral
DLI describes the total amount of photosynthetic light received over a full day and accounts for both intensity and duration.
A Practical Way to Find the Right Height
Set the lamp to its recommended seedling height and switch it on for the planned daily schedule. Check whether the fixture covers all the plants, then inspect the leaves and stems each day. If the seedlings stretch despite suitable temperatures and proper spacing, the light may be too weak, too high, or on for too few hours.
If the leaves become bleached or curled after you lower the lamp, increase the distance or reduce the output. Give plants time to show a response before making another major adjustment. Keep a simple note of the height, dimmer setting, and daily hours so you can repeat a successful setup.
Start with the manual
Use the light maker's stated height and output setting rather than a distance copied from an unrelated fixture.
Make one change at a time
Changing height, duration, and watering at once makes it harder to identify the real cause of a problem.
Position Grow Lights Directly Above the Seedlings
Place the fixture above the growing area so light reaches the seedlings from overhead. This arrangement encourages upright growth and reduces the strong sideways pull that can happen when a lamp sits off to one side. Center the fixture over the tray, and keep it parallel to the surface unless the manufacturer recommends a different setup.
If you use a narrow light bar, check that its beam covers the full width of the tray. One bar may be enough for a small group of seedlings, while a wider shelf may need two or more bars. The right number depends on the fixture's coverage map and the size of the plants, not simply the number of pots.
Avoid placing trays far to one side of a window and relying on a lamp aimed diagonally across them. The seedlings closest to the light may receive too much while those farther away remain weak. If you must use a side-mounted lamp, rotate the trays regularly and monitor growth, but overhead lighting is usually easier to manage.
Leave enough space around the plants to allow air to move. Seedlings should not press against the fixture, and hanging hardware must support the lamp securely. Keep the light away from splashing water and arrange cords so they cannot be pulled down when you water or move the trays.
Source: artofit.org
Center the fixture
Align the light with the tray rather than the shelf edge or a single plant.
Keep the light level
A level fixture helps prevent one side of the growing area from receiving much stronger light.
Cover the full tray
Use the manufacturer's coverage information to decide whether you need more than one light bar.
Secure the setup
Use stable shelves and appropriate hanging hardware to keep the fixture from falling onto plants or people.
How to Light Seedlings on a Shelf
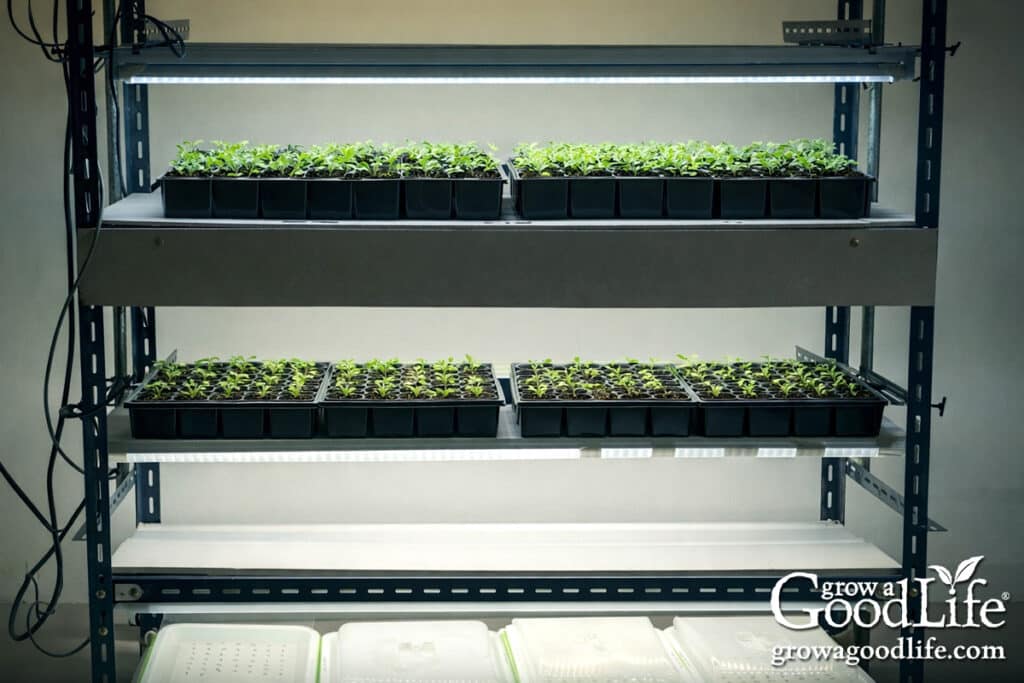
A shelf is one of the simplest ways to start seeds indoors in a spare room, basement, or utility area. Put the seed trays on a flat, waterproof surface, then mount the light so you can raise it as plants grow. Adjustable chains, a sturdy stand, or a purpose-built shelf fixture can make this task easier.
For a long shelf, use a fixture that covers the full length of the trays. If you use several lights, space them according to their coverage patterns so that the edges overlap enough to avoid dark gaps. Check the plants at both ends and in the middle because the brightest area may be directly beneath the center of each fixture.
Keep the shelf away from drafts, heating vents, and direct contact with cold windows. Large temperature swings can affect seedling growth and may be mistaken for a lighting problem. A stable environment makes it easier to judge whether your lamp position is working.
Use adjustable supports
A height-adjustable setup makes it easier to keep the correct gap as the plants grow.
Check the edges
Look for uneven stem length or leaf color at the sides of the tray to identify poor coverage.
How to Position Lights Near a Window
A grow light can supplement window light, especially in homes where winter days are short or windows face a shaded direction. Position the fixture above the seedlings and account for both natural and artificial light. A sunny south-facing window may provide useful extra light in many parts of the United States, but seasonal sun angles, nearby buildings, trees, and window glass all affect the amount that reaches the plants.
Do not assume that a bright window eliminates the need for a suitable lighting schedule. Observe how the seedlings grow over several days. If they lean toward the glass or stretch despite the lamp being on, rotate the trays when practical and check whether the fixture needs a height or intensity adjustment.
Combine light sources thoughtfully
Account for daylight when judging total exposure, especially during long summer days.
Watch for cold glass
Keep leaves from touching cold windowpanes, which can damage tender growth.
How Many Hours Should Grow Lights Stay On?
Most common vegetable seedlings do well with about 12 to 16 hours of suitable light each day, followed by a regular dark period. The exact need depends on the plant species, light intensity, natural daylight, and growing conditions. A longer schedule cannot always make up for a lamp that delivers too little light.
For a practical starting point, set a timer for 14 hours of light and 10 hours of darkness. Check your seed packet and the light manufacturer's instructions, then adjust the schedule if the seedlings show signs of stress or inadequate light. Herbs and flowers may have different needs, so use the same method of observation rather than assuming every plant needs an identical routine.
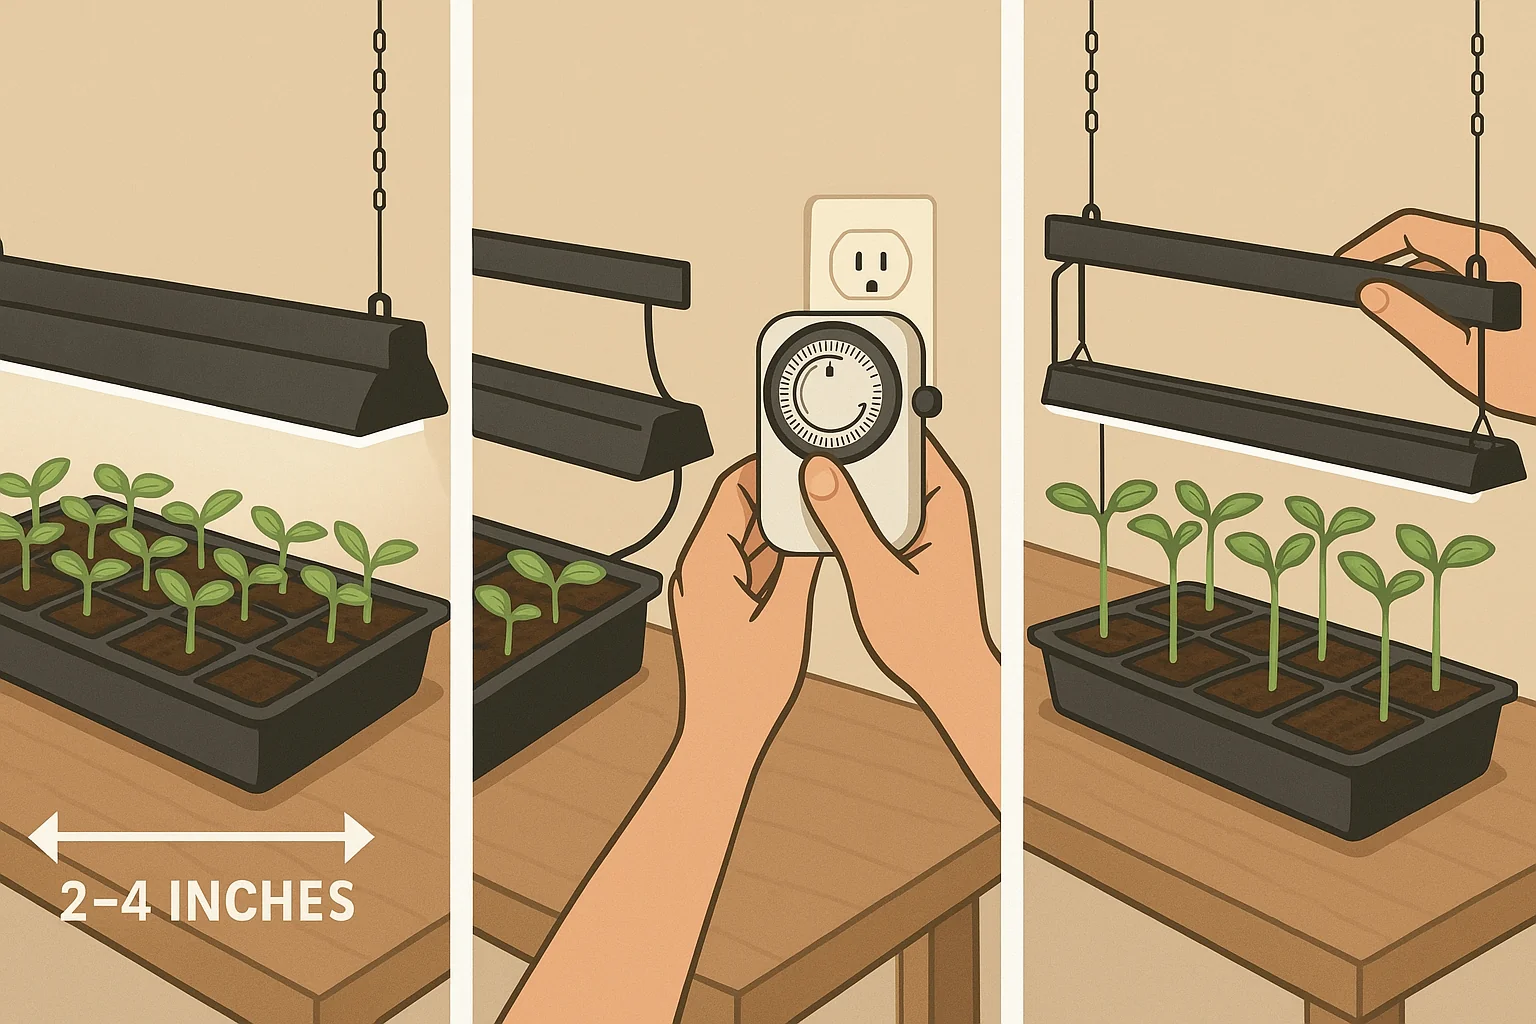
A timer is useful because it keeps the schedule consistent even when work, school, or family routines change. It also prevents the common mistake of leaving lights on around the clock. Plants use their dark period for normal biological processes, and continuous light is not necessary for most seedlings.
If seedlings also receive strong natural daylight, count that exposure when planning the total daily light. A lamp running for 16 hours beside a bright window may provide a different total dose from the same lamp in a dark basement. Adjust the schedule with the full growing environment in mind.
Source: growlightinfo.com
Use a timer
Automate the daily on and off times so plants receive a steady routine.
Allow darkness
Give seedlings a regular night period instead of leaving the lamps on all day and night.
Count daylight
Natural sunlight adds to the daily light received by plants and may change how long the lamp needs to run.
A Sample Daily Lighting Schedule
For seedlings growing in a basement or a room without useful daylight, a 14-hour schedule is a reasonable starting point for many vegetables. For example, turn the lights on at 6:00 a.m. and off at 8:00 p.m. The seedlings then receive 14 hours of artificial light and 10 hours of darkness.
This schedule is an example, not a rule for every crop or fixture. If the lamp's output is low, the plants may still stretch. If the lamp is very intense, extending the schedule may increase stress rather than solve the problem. Check the light level and plant response before changing the duration.
6:00 a.m.
The grow lights switch on at the start of the daily light period.
8:00 p.m.
The lights switch off, giving seedlings a consistent dark period overnight.
Should Newly Sprouted Seedlings Get the Same Schedule?
Once seedlings emerge, provide suitable light promptly so their stems do not stretch while they search for a stronger source. Many gardeners keep the light at the same daily duration used for established young seedlings, then adjust intensity or height based on the fixture and crop. The important point is to avoid leaving emerging seedlings in a dim room for several days.
Seeds that have not yet emerged may have different temperature and darkness needs during germination. Follow the seed packet's instructions for each crop. Once the seedlings appear, make sure the light reaches their leaves rather than assuming that a lamp positioned over the tray is automatically close enough.
Watch for emergence
Check trays daily and make sure newly emerged seedlings receive adequate light.
Follow crop guidance
Some seeds need light to germinate, while others are normally covered with growing medium.
Choose the Right Light Position for Different Seedlings
Different seedlings may need different light levels, so group plants with similar needs when possible. Tomatoes, peppers, and many common vegetable starts generally benefit from bright light that supports compact growth. Some shade-tolerant ornamental plants may need less intense light, while many herbs grow best under a relatively bright setup.
The fixture's output matters as much as the plant name. A powerful grow panel may need to sit higher or run at a lower dimmer setting than a modest LED strip. If you grow several types of plants on the same shelf, use adjustable fixtures or separate zones so one group does not receive too much or too little light.
Seedlings also differ in height. Tall tomatoes can shade short herbs or flowers when they share a tray. Place shorter plants where the light is more even, or separate trays as the seedlings grow. This small change can prevent one plant from taking most of the available light.
Source: homesteadandchill.com
Tomatoes and peppers
Provide strong, even light and watch for stretching, especially after the first true leaves appear.
Leafy vegetables
Lettuce and similar crops need adequate light for compact growth, but intensity and duration should match the fixture and conditions.
Herbs
Basil and many other culinary herbs grow well under suitable bright lighting, while individual species may differ.
Flowers
Use crop-specific guidance when growing flowers because light needs and growth habits vary widely.
Adjusting Light as Seedlings Grow
Check the height of your seedlings every day or two. As the canopy rises, the distance to the lamp becomes smaller even when the fixture stays in place. Raise the light before the leaves crowd against it, while keeping the fixture within its recommended operating range.
If you use a fixed-height fixture, raise the trays on a stable platform when the plants are very small, then remove the platform as they grow. Make sure the platform is secure and does not block airflow. Avoid stacking loose boxes or unstable items beneath water-filled trays.
Do not adjust the height based only on the tallest plant if the rest of the tray is much shorter. If the difference becomes large, separate the plants by height or move larger seedlings to another shelf. This makes it easier to provide consistent light without stressing the smaller plants.
Check the canopy
Measure the gap between the light and the upper leaves rather than the soil surface.
Separate uneven plants
Move tall seedlings to another tray or shelf if they shade smaller plants.
Why Seedling Growth Can Change After Transplanting
Seedlings may grow more slowly for a short time after you move them into larger pots. The change can result from root disturbance, altered moisture levels, temperature differences, or a new light environment. Do not assume every pause in growth means the grow light is too weak.
After transplanting, keep the light position stable and check the plants' water needs. If you move them to a much brighter fixture or increase the output sharply, make the change gradually. A steady environment gives the roots time to establish and makes any lighting problems easier to identify.
Keep conditions steady
Avoid changing light height, intensity, watering, and temperature all at once.
Check moisture first
Overly wet or dry growing medium can cause stress that resembles a lighting problem.
Step-by-Step Setup for Healthy Indoor Seedlings
A good grow light setup starts with a stable growing area and a clear plan. Before planting, check that your shelf can support the trays, water, and lighting hardware. Keep the area away from direct splashes and make sure you can reach the seedlings without pulling on cords or moving the fixture.
Choose a light designed for plant growth, then check the coverage area and recommended hanging height. A full-spectrum white LED fixture is often practical for home seed starting because it provides usable light for plants and makes leaf color easier to inspect. A specialized fixture is not required for every home garden, but an ordinary room lamp may not provide enough intensity or coverage.
After mounting the fixture, place the trays beneath it and set a timer. Water carefully so the growing medium stays suitably moist without leaving trays submerged in water. Check the light height and the plant canopy each day, especially during periods of fast growth.
Source: sowrightseeds.com
Prepare the growing area
Use a stable shelf or table, keep water away from electrical connections, and leave enough space to inspect the plants.
Mount the light securely
Follow the instructions for hanging, ventilation, minimum clearance, and electrical use.
Position the trays
Center the seedlings under the fixture and check that the light reaches the full growing area.
Set the daily schedule
Use a timer to provide a consistent period of light and darkness.
Monitor growth
Inspect stem length, leaf color, plant posture, and moisture before making adjustments.
A Simple Example for a Home Vegetable Garden
Imagine that you are starting tomatoes, peppers, and basil in a spare room in Ohio or Pennsylvania. You have a shelf, two shallow trays, and an adjustable LED fixture. Begin by placing the trays side by side and centering the light over both, provided its coverage is wide enough.
Set the initial height using the fixture instructions and start with a 14-hour daily schedule if that suits the crops and the light. As the seedlings emerge, inspect both trays for differences in stem length and leaf color. If basil grows well but the tomatoes stretch, check whether the tomatoes are crowded or shaded before changing the light for every plant.
When the seedlings become taller, raise the fixture to maintain the recommended distance. If the outer plants begin to lean or stretch, check the coverage map and consider repositioning the trays or adding a suitable light bar. This method works because each adjustment responds to a visible need instead of relying on a fixed rule.
Keep a simple record
Write down the fixture height, timer schedule, and any changes in plant growth.
Check the entire shelf
Compare seedlings at the center and edges so poor coverage does not go unnoticed.
Signs Your Setup Is Working
Healthy seedlings usually develop sturdy stems, leaves with an expected color for the species, and steady new growth. They should not all lean strongly in one direction, and plants across the tray should grow at reasonably similar rates when their ages and conditions match.
Look at the newest leaves rather than judging success only by older growth. Previously stretched stems may remain long, and damaged leaves may not regain their original color. Fresh growth over the next several days offers a better indication of whether your changes are helping.
Compact new growth
New stems and leaves develop without excessive stretching.
Even leaf color
Leaves retain their normal color without new bleaching or widespread yellowing.
Similar growth across the tray
Plants receive reasonably even light, allowing for natural differences between seedlings.
Common Grow Light Problems and How to Fix Them
When seedlings look unhealthy, check the light setup, temperature, watering, and plant spacing before assuming that the lamp itself is faulty. Several problems can produce similar symptoms. A useful troubleshooting method starts with the simplest checks and changes one factor at a time.
First, confirm that the light turns on reliably and runs for the intended number of hours. Next, check its distance from the leaves and whether the beam covers the entire tray. Then review room temperature, airflow, watering, and the condition of the growing medium.
Give plants time to respond after a change. A new leaf may take several days to develop, and existing damage will not always disappear. If symptoms spread despite suitable light and care, inspect for pests, disease, root problems, or nutrient issues rather than continuing to move the fixture.
Source: fity.club
Long, thin stems
Check for low light intensity, excessive distance, crowding, and temperatures that encourage rapid growth. Lower the lamp only within the manufacturer's recommended range.
Pale or bleached leaves
Consider excessive light, heat, nutrient problems, or root stress. Raise or dim the fixture if the problem began after increasing light exposure.
Seedlings leaning sideways
Center the light above the tray and check whether one side receives less light.
Brown or crispy leaf edges
Check light intensity, heat, watering, and air movement. Do not assume that the lamp is the only cause.
Slow growth
Check temperature, moisture, nutrition, root health, light intensity, and daily exposure before making a single large lighting change.
Why Are Seedlings Stretching Even Under Grow Lights?
Seedlings can stretch under a lamp when the light reaching their leaves is still too weak. The fixture may hang too high, produce too little output, or cover the tray unevenly. A long daily schedule does not guarantee enough intensity, so check the actual setup rather than simply adding more hours.
Crowding can also make seedlings compete for light. If leaves overlap, thin the plants according to the crop's needs or transplant them into separate containers. Keep temperatures suitable for the species because overly warm conditions can encourage rapid stem growth when light is limited.
Check distance and output
Use the fixture's recommended range and increase intensity only as the plants can tolerate it.
Reduce crowding
Give leaves enough space so plants do not shade one another.
Review temperature
Keep seedlings within the suitable temperature range for the crop instead of using excess warmth to speed growth.
Why Are Seedling Leaves Turning Yellow?
Yellow leaves do not automatically mean that seedlings need more light. Overwatering, poor drainage, nutrient shortages, root damage, and normal loss of the first seed leaves can all cause yellowing. Look at which leaves are affected, how quickly the change occurs, and whether the growing medium stays wet for too long.
If the yellowing begins soon after a major lighting change, review the lamp height and duration. If it continues while the light setup remains stable, check the roots and watering routine. Avoid adding fertilizer or changing several conditions at once unless the evidence points to a clear need.
Inspect older and newer leaves
The location of the yellowing can help distinguish normal seed-leaf aging from a broader growth problem.
Check drainage
Make sure containers have drainage holes and the growing medium is not constantly saturated.
Safety Tips for Indoor Grow Lights
Set up grow lights with electrical safety in mind, especially when watering several trays each day. Water and electricity are a dangerous mix, so keep plugs, power strips, and connections away from spills and standing water. Place cords where they cannot be snagged by trays, pets, or people walking past the shelf.
Use a fixture that is suitable for the location and follow its installation instructions. Do not exceed the rated load of a timer, extension cord, or power strip. Avoid covering ventilation openings or placing materials against a light that needs airflow to manage heat.
Use stable hanging hardware and check it regularly. A fixture should not be able to fall onto the seedlings if a chain slips or a shelf shifts. Unplug the equipment before cleaning it or changing connections, and allow the lamp to cool if the manufacturer requires it.
Do not use ordinary indoor grow lights as a source of tanning or direct eye exposure. Avoid staring into bright LEDs, and follow the manufacturer's guidance on viewing distance and protective equipment. If a fixture, cord, or plug becomes damaged, stop using it until the issue has been addressed safely.
Source: heksamiz.blogspot.com
Keep water away
Position electrical connections above and away from the area where you water the seedlings.
Follow rated limits
Use compatible timers and power accessories that can handle the connected equipment.
Maintain airflow
Keep ventilation openings clear and follow the stated clearance requirements.
Inspect cords and supports
Replace damaged equipment and secure hanging fixtures before continuing to use them.
Can Grow Lights Overheat Seedlings?
Yes, some fixtures can heat the surrounding area or plant canopy enough to stress seedlings. The amount of heat depends on the fixture design, power, ventilation, distance, and room conditions. Even when the leaves do not feel hot, intense light can still exceed what young plants can tolerate.
Follow the manufacturer's minimum clearance and inspect the plants after switching on the lamp. If the growing area becomes too warm, increase ventilation where practical, reduce the light output if possible, or use a fixture suited to the space. Do not solve overheating by placing a lamp in an unstable position or blocking its vents.
Check room conditions
Warm rooms and enclosed shelves can trap heat around seedlings.
Use safe adjustments
Follow the fixture's operating limits when changing height, output, or ventilation.
Frequently Asked Questions
Q
Should grow lights be closer to seedlings or farther away?
Start with the distance recommended by the light manufacturer. Move the fixture closer only if its output and instructions allow it and the seedlings show signs of inadequate light. If leaves bleach, curl, or show other new signs of stress after you lower the light, raise it or reduce the output.
Q
Can I leave grow lights on for 24 hours?
For most common vegetable seedlings, a 24-hour lighting schedule is unnecessary. Many grow well with about 12 to 16 hours of light and a regular dark period. Use a timer to keep the schedule consistent, and follow crop-specific guidance when available.
Q
Are regular LED bulbs good for starting seeds?
Some ordinary white LED bulbs can support seedlings if they provide enough light, cover the growing area, and can be positioned safely. However, household bulbs vary in output and beam spread, so a bulb that lights a room well may not provide enough usable light at leaf level. A grow light with clear coverage and hanging guidance is often easier to manage.
Q
Do seedlings need light as soon as they sprout?
Yes, most seedlings need suitable light soon after they emerge. If they remain in dim conditions, their stems can stretch before they develop their first true leaves. Check trays daily and move newly emerged seedlings under the light promptly, while following the seed packet's germination instructions.
Q
How do I know if my grow lights are too strong?
Possible signs include bleached areas, curling leaves, unusual discoloration, or stress that begins after you increase light intensity. These symptoms can also come from watering, temperature, or nutrient problems. Compare the plants' condition with the timing of your lighting changes, then raise or dim the light if excessive intensity seems likely.
Q
Should grow lights be placed directly over the center of a seed tray?
Centering the fixture over the tray is a good starting point, but the beam must cover the entire growing area. If seedlings at the edges stretch or grow more slowly, the light may be too narrow or too high. Check the coverage information and consider repositioning the trays or adding a compatible fixture.
Q
Do seedlings need direct sunlight if they already have grow lights?
No, seedlings can grow indoors under suitable grow lights without direct sunlight. The fixture must provide enough usable light for the crop and cover the plants evenly. Natural daylight can supplement artificial light, but sudden changes from indoor lighting to strong outdoor sun can scorch tender plants, so harden seedlings off gradually before transplanting them outdoors.
✦ Wrapping Up
Conclusion
Healthy indoor seedlings need the right light in the right place for the right amount of time. Position the fixture above the plants, follow the manufacturer's recommended distance, and make sure the entire tray receives even coverage. For many vegetable seedlings, a daily schedule of about 12 to 16 hours is a useful starting point, provided the light intensity suits the crop.
Keep watching your plants as they grow. Long stems may point to weak or uneven light, while bleaching or curling can signal excessive intensity or another form of stress. Check watering, temperature, and spacing before making large changes, and adjust one factor at a time so you can see what helps.
A reliable indoor seed-starting setup does not need to be complicated. A stable shelf, an adjustable light, a timer, and a few minutes of daily observation can help you raise sturdier plants for your spring or summer garden. As the canopy rises, raise the fixture or adjust its output within the manufacturer's limits.
💡 Key Takeaway
Today, place your grow light directly above the seedling tray, measure the distance from the lamp to the top leaves, check the manufacturer's recommended range, and set a timer for a suitable daily schedule. Inspect the seedlings every day and adjust the setup gradually as they grow.






No comments:
Post a Comment