The home and garden are dedicated to improving and beautifying living spaces inside and out. This niche contains home essentials, lawn care and landscaping advice, and gardening techniques. It aims to help individuals create attractive, functional, and personalized environments, enhancing their homes and outdoor areas. Whether maintaining a lush lawn, cultivating a garden, or embarking on a DIY project, this niche provides valuable insights and inspiration to elevate your living spaces.
Low-Cost Ways to Make a Backyard More Private: Easy Ideas
The cheapest ways to make a backyard more private include growing dense plants, adding DIY screens, reusing fence panels, hanging outdoor curtains, and rearranging seating to block unwanted views. Start with the area where privacy matters most, then choose a solution that suits your budget, climate, and yard.
A backyard should feel like a place to relax, not a stage where the neighbors can see every move. In many American neighborhoods, homes sit close together, fences stop short of the patio, and second-story windows look straight into outdoor seating areas. A few smart changes can make these spaces feel more secluded without the cost of a full privacy fence.
The best low-cost plan starts with the view you want to block. A gap beside the fence calls for a different fix than a patio overlooked by an upstairs bedroom. Plants can soften a boundary, a movable screen can shield a chair, and a simple curtain can create privacy around a covered porch. The right mix depends on how quickly you need results and how much upkeep you can manage.
You do not need to redo the whole yard at once. Begin with one seating area, a hot tub, a garden bench, or the part of the yard where your family spends the most time. Measure the space, check sunlight and wind, and compare the cost of materials before buying anything. A small, well-placed screen often works better than a long barrier that costs more and makes the yard feel cramped.
Source: mygardeningstories.com
1. Find the Views You Need to Block First
The most affordable privacy upgrade is often the one that covers the smallest area. Walk around your yard and look at it from the places where you sit, eat, garden, or let children play. Then look back from the neighboring windows, sidewalks, and nearby homes to understand which views create the biggest problem.
Think about privacy at different heights. A low fence may hide a seated person from a neighbor at ground level but do little against a second-story window. A tall shrub may block a window but leave a patio entrance exposed. Matching the barrier to the sightline helps you avoid spending money on a solution that misses the target.
Sketch a basic yard plan on paper. Mark your patio, property boundaries, doors, windows, and the directions from which people can see into the space. Note sunny and shady areas, too, because these details affect where screens, containers, and plants will work best.
Source: plusmood.com
For a visible patio
Start with a screen, planter row, or outdoor curtain beside the seating area rather than fencing the entire yard.
For an overlooked lawn
Consider a layered planting bed, a permitted fence extension, or a combination of shrubs and a trellis.
For a second-story view
Look at overhead angles, a pergola with suitable screening, or a carefully placed tall plant. Ground-level barriers alone may not solve the problem.
For a rental property
Favor freestanding screens, containers, removable curtains, and other changes that do not permanently alter the property.
Make a Simple Privacy Budget
Set a spending limit before you shop. Divide the project into materials, supports, fasteners, soil or containers, and any delivery or tool costs. If you already own planters, lumber, or outdoor fabric, reuse those items where they are sound and suitable for outdoor use.
Compare the total cost of each option, not just the price of its main material. A low-cost fabric screen may need replacement sooner than a well-built wooden panel. A small shrub may cost little at first but need several growing seasons to create a useful visual barrier. Include maintenance and replacement in your decision.
Set a priority
Choose the one view that bothers you most and address it first.
Reuse safe materials
Inspect old boards, pallets, and frames for rot, loose nails, chemical treatment, and sharp edges before using them.
Leave room for upkeep
Keep part of your budget for pruning, watering, repairs, and replacement parts.
2. Use DIY Privacy Screens for Fast Results
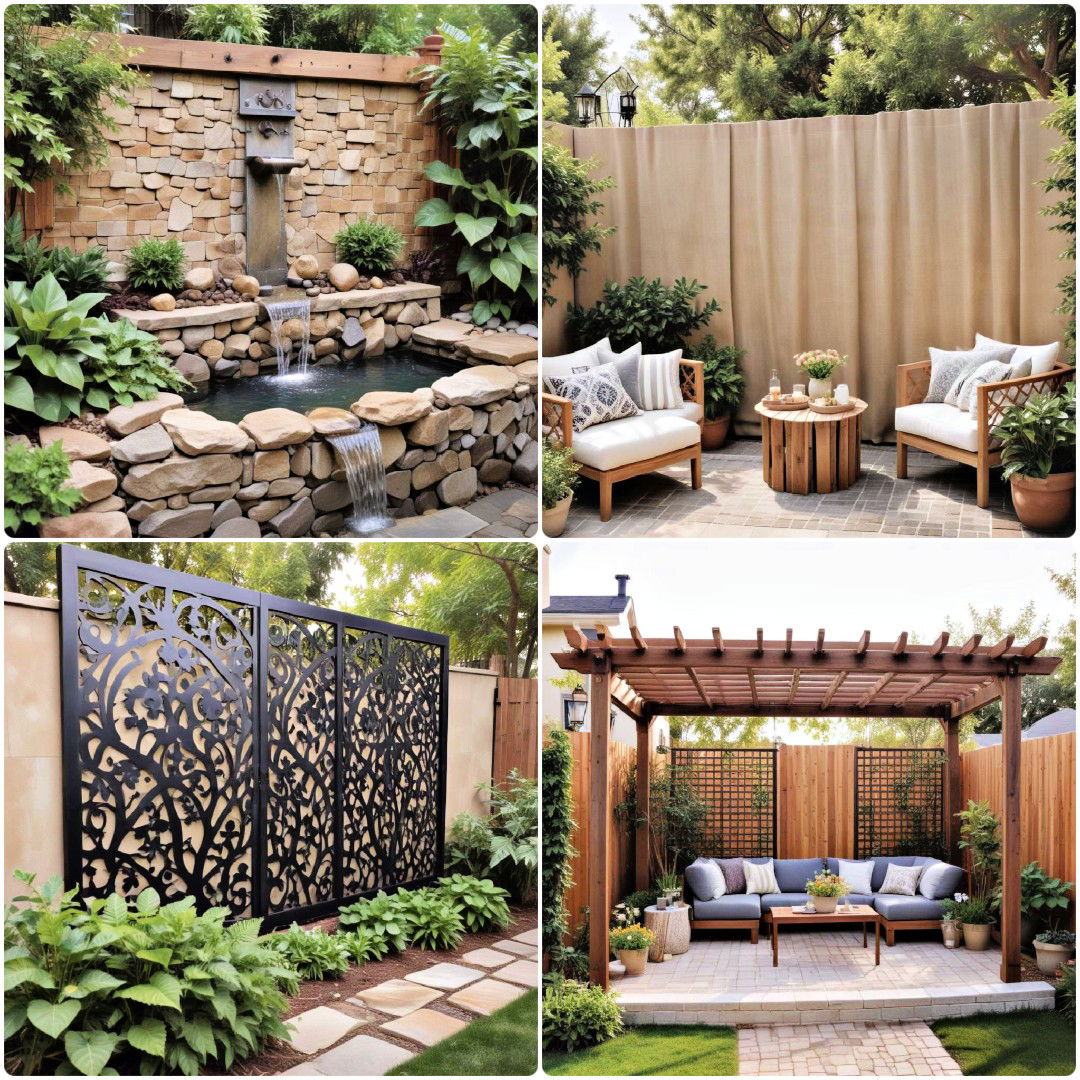
A freestanding privacy screen is one of the quickest ways to shield a patio chair, outdoor dining table, or small relaxation area. Unlike a full fence, it covers only the spot that needs protection. It can also be moved when you rearrange the yard, provided its base is stable and the screen is safe to handle.
You can make a basic screen from exterior-rated wood boards, a sturdy frame, or a suitable existing panel. Space the boards closely enough to block the desired view while leaving gaps for airflow. Sand rough edges, use fasteners made for outdoor conditions, and apply a finish intended for the material if needed.
The key issue is stability. A tall, lightweight panel can act like a sail in strong wind, especially in exposed yards or storm-prone parts of the United States. Use a wide, stable base or suitable anchors, and follow the manufacturer's installation instructions. Do not rely on a loose planter or a few small screws to hold a large screen upright.
Source: fity.club
Repurpose an old fence panel
Use a sound panel as a visual barrier if its size, condition, and support system suit the location. Remove protruding nails and repair damaged boards before installation.
Build a slatted wood screen
Attach exterior-rated slats to a sturdy frame. Adjust the gaps to balance privacy, light, and airflow.
Use a folding screen outdoors
Choose a model rated for outdoor use and secure it when needed. Bring it inside during severe weather if its design requires that.
Create a small screened corner
Place one or two panels around the back and side of a seating area instead of building a complete enclosure.
How to Build a Basic Wooden Screen
First, measure the width and height needed to block the unwanted view. Choose a panel size that does not obstruct doors, walking routes, or a neighbor's access. Check local rules before installing a screen that could be treated as a fence or permanent structure.
Next, assemble a frame from sound, exterior-suitable lumber and attach the slats with outdoor-rated fasteners. Check that the frame is square and that all edges are smooth. Finish the wood according to the product instructions, then mount the screen on a stable support or anchor it to an appropriate structure.
Finally, test the screen gently from several angles. Sit in the intended seating spot and look toward the exposed area. If the gap remains visible, shift the panel before adding more material. Check the supports again after strong wind and at regular intervals.
Signs the screen works
The main sightline is blocked, the panel stays upright, and the area still allows safe movement and airflow.
If it wobbles
Stop using it until you improve the base, supports, or anchors. Do not add more height to an unstable panel.
3. Grow Privacy With Affordable Plants
Plants create privacy while adding shade, texture, flowers, and habitat for wildlife. They are especially useful when a fence feels harsh or when you want to soften a boundary without covering every inch with a solid barrier. The trade-off is time: most young plants need several growing seasons to form a dense screen.
Choose plants for your local conditions rather than relying on a generic list of fast-growing shrubs. Across the United States, summer heat, winter cold, rainfall, soil drainage, and sunlight vary widely. Check the USDA Plant Hardiness Zone Map for winter-temperature guidance, then confirm that the plant also suits your soil, light, and moisture conditions.
Evergreen shrubs can offer year-round coverage where they grow well, while deciduous shrubs may provide less screening in winter. Ornamental grasses can create a soft screen during the growing season, but some die back in cold weather. A mix of suitable plants may provide a more natural look and reduce the risk of relying on a single species that struggles in your yard.
Source: www.pinterest.com
Use small shrubs
Buy healthy, appropriately sized plants that fit your budget. Smaller specimens often cost less, though they take longer to reach the desired height.
Try ornamental grasses
Choose noninvasive varieties suited to your region. Check mature height, spread, and winter appearance before planting.
Grow climbing plants
Train suitable vines on a sturdy trellis to add coverage along a fence or patio. Match the species to your climate and keep growth away from siding and utility equipment.
Arrange containers in a row
Use large, stable pots with shrubs, tall herbs, or ornamental plants for a flexible screen that can suit patios and rental homes.
Plant for the Mature Size, Not the Nursery Size
A small shrub can look harmless in a garden center but become wide and tall after a few years. Read the plant label and allow enough room for its mature spread. Crowding plants together to get instant coverage can lead to poor airflow, difficult pruning, and competition for water.
Place taller plants where they block the unwanted view without shading the entire yard. Use lower plants in front to create a layered look. If the area is shaded by a house or mature trees, select plants that tolerate those conditions instead of trying to force sun-loving shrubs to grow there.
Water new plants as needed while their roots establish, and mulch the soil surface to help conserve moisture. Keep mulch away from direct contact with stems and trunks. Avoid adding fertilizer unless the plant and soil conditions call for it; too much fertilizer does not solve poor light or unsuitable drainage.
For year-round coverage
Look for evergreen plants that suit your local climate and available space.
For a low-cost seasonal screen
Consider annual sunflowers or other tall annuals where sunlight, growing-season length, and local conditions allow.
For small yards
Choose compact or narrow-growing plants and check mature width before buying.
For dry regions
Favor locally adapted or drought-tolerant plants once established, but provide appropriate water during establishment.
4. Add a Trellis for Vertical Privacy
A trellis makes good use of vertical space, which is valuable in narrow side yards and compact suburban gardens. It can support climbing plants or act as a partial screen on its own. Since it covers a smaller footprint than a thick hedge, it can help keep paths and patios open.
A basic trellis may be made from exterior-rated wood lattice, wire panels, or a purpose-built garden frame. Before attaching anything to a fence or wall, confirm that the existing structure can support the added weight and wind load. A trellis covered in mature vines can become much heavier than an empty frame.
Choose the climbing plant with care. Some vines spread quickly and may be hard to control, while others need regular tying and pruning. Avoid invasive species, and do not allow vines to damage siding, block vents, or grow into gutters. A trellis without plants can still provide partial privacy if its design blocks the right angle.
Source: fity.club
Use lattice panels
Place a suitable panel beside a patio or along a permitted boundary. The openings provide some privacy but will not fully block every view.
Reuse a garden frame
Repurpose a sound frame or wire support if it is sturdy enough for outdoor use and compatible with the chosen plant.
Grow seasonal climbers
Annual climbing plants can provide coverage during warm months without committing to a permanent woody vine.
Keep access clear
Leave room to prune, inspect the structure, and reach the fence for maintenance.
When a Trellis Is Better Than a Fence
A trellis works well when you want to block a view without building a solid wall. It suits garden seating, small patios, and narrow strips beside a fence. It may be less effective where complete visual separation or a strong physical barrier is required.
If you need coverage right away, use the trellis with a suitable outdoor screen or fabric panel while plants grow. Secure any added covering properly, because fabric and dense foliage can increase wind pressure. Remove or secure temporary coverings when severe weather is expected, following the product guidance.
Places that need a fully opaque barrier immediately or locations where wind exposure makes an unsupported frame unsafe.
5. Hang Outdoor Curtains Around a Patio or Porch
Outdoor curtains can create a private retreat around a covered porch, pergola, or suitable patio frame. They are often cheaper than a fence because they cover a small, defined area. When open, the curtains preserve the view and airflow; when closed, they block direct sightlines into the seating space.
Use fabric intended for outdoor exposure and a rod or track rated for the span and expected load. Weather-resistant material can reduce fading and moisture damage, but no fabric is maintenance-free. Check the care instructions, allow damp fabric to dry, and store removable panels during severe weather when the product guidance calls for it.
Curtains are not a good choice for every yard. They need a safe support structure, and wind can pull hard on both the fabric and its fasteners. Do not attach a heavy curtain rod to weak trim or a flimsy frame. If your patio is uncovered, a freestanding screen or planter arrangement may be simpler and more durable.
Source: mightypaint.com
Choose washable fabric
Outdoor-rated curtains that can be cleaned or removed make routine upkeep easier.
Cover only the exposed side
One curtain panel or a short run of panels may be enough to shield a table or bench.
Use secure hardware
Match rods, tracks, brackets, and fasteners to the structure and fabric weight.
Plan for weather
Open, tie back, remove, or store panels as appropriate before strong winds and storms.
A Low-Cost Alternative to New Curtains
If you already own suitable outdoor fabric, you may be able to reuse it for a simple curtain panel. Check that the material can withstand the exposure and that it is clean and in good condition. Indoor fabric may deteriorate faster outdoors, particularly in direct sun or repeated moisture.
Avoid using loose sheets or lightweight fabric as a permanent wind-exposed barrier. These materials can tear or pull free and may create a hazard. For a temporary setup, keep the fabric small, secure, and easy to remove.
For covered porches
A curtain panel can screen one open side without enclosing the whole space.
For uncovered patios
Consider a properly anchored screen or a row of planters instead of unsupported fabric.
6. Reuse Materials to Create an Affordable Boundary
Reusing suitable materials can reduce the cost of a privacy project, especially when you need only a short screen. Old fence boards, sound timber, leftover lattice, and sturdy frames may be useful if they remain structurally sound. The goal is to save on materials without creating a barrier that can fall, splinter, or rot.
Pallets are sometimes used for DIY garden screens, but not every pallet is suitable for reuse. Inspect the wood for stains, spills, mold, decay, and broken boards. Look for treatment markings and avoid wood with unknown chemical exposure, especially around edible gardens or places where children play. Do not burn unknown or treated wood.
A recycled panel can be painted or stained to match existing outdoor features, provided the coating is suitable for the material and its intended exposure. Prepare the surface as directed by the coating manufacturer. If a panel will touch soil or remain damp, account for faster decay and plan to inspect it regularly.
Source: artofit.org
Reclaimed fence boards
Use boards that remain solid, straight, and free of serious rot. Remove old nails and check their origin before reuse.
Leftover lattice
Use intact panels for partial privacy around garden beds, patios, or seating corners.
Old planters
Arrange stable containers along the exposed side of a seating area and fill them with plants suited to the local conditions.
Salvaged frames
Repurpose sturdy frames only after checking their joints, corrosion, fasteners, and resistance to outdoor conditions.
How to Keep a Recycled Screen Safe
Check the material from top to bottom before assembly. Reject boards with deep cracks, severe rot, chemical stains, or loose sections that cannot be repaired safely. Sand rough surfaces and remove protruding metal, then use appropriate gloves and eye protection during cutting and fastening.
Place the finished screen where it will not block a walkway, gate, drain, or emergency exit. Make sure it cannot tip toward a path or seating area. Recheck the supports after rain, freezing weather, or strong winds.
Avoid unknown treatments
Do not assume old outdoor wood is safe simply because it looks clean.
Inspect fasteners
Replace rusty, loose, or unsuitable fasteners with hardware appropriate for the material and exposure.
Protect against tipping
Use stable supports and suitable anchoring based on the screen's dimensions and location.
7. Rearrange Furniture to Create a More Private Space
You may be able to improve privacy without buying a single new item. Move chairs, benches, and dining tables away from the most exposed sightline. Turn seating toward a garden bed, wall, or attractive view rather than toward a neighbor's window.
Use existing furniture and planters to define a small outdoor room. A bench placed against a sheltered wall may feel more private than chairs scattered across an open lawn. A table positioned beside a screen can gain privacy from one direction while remaining open to the rest of the yard.
Keep comfort and safety in mind. Do not block doors, stairs, gates, access paths, or equipment that needs service. Leave enough space to walk around chairs and tables, and avoid placing heavy planters where they could fall or obstruct drainage.
Source: outdoorfuse.com
Turn the seating inward
Arrange chairs to face each other or a garden feature rather than the neighboring property.
Use a corner
Place a bench or small table where two existing walls or fence sections already block views.
Group containers
Move existing pots together to form a partial green screen beside a chair or dining area.
Create a defined zone
Use an outdoor rug, a small table, and a few plants to make a private-feeling seating area within the larger yard.
Test the Layout Before Buying Anything
Move lightweight furniture into a new position and sit there at different times of day. Check the view from the sidewalk, the neighboring fence line, and any visible windows. The sun's angle may change how exposed a seat feels, so test the layout when you normally use the space.
If the new arrangement improves privacy but leaves one gap, add a single screen or planter there. This targeted approach can prevent unnecessary spending on several panels or a large planting bed.
Best for
Small yards, patios, rental properties, and homeowners who want a quick improvement.
Main limitation
Furniture placement cannot fully block a direct view from a high window or an exposed property boundary.
8. Compare the Best Low-Cost Privacy Options
The best solution depends on how quickly you need privacy, the area you want to cover, and how much maintenance you can handle. A temporary screen can solve a problem today, while plants can create a softer boundary over time. Combining the two can offer immediate coverage without committing to a large construction project.
The following comparison is qualitative rather than a price survey. Actual costs vary by region, material quality, dimensions, delivery, and whether you already own useful supplies. Get local prices before setting a final budget, and compare the cost of the complete installation rather than one item.
Source: outdoorfuse.com
DIY screen
Speed: immediate after installation. Cost: low to moderate for a small panel. Best use: patios, seating corners, and exposed gaps. Upkeep: check supports, fasteners, and finishes.
Privacy plants
Speed: gradual. Cost: potentially low when starting with small plants. Best use: yard boundaries and natural-looking screens. Upkeep: watering, pruning, and seasonal care.
Outdoor curtains
Speed: immediate once installed. Cost: low to moderate for a small covered area. Best use: porches and pergolas with suitable supports. Upkeep: washing, drying, and weather management.
Trellis with vines
Speed: partial coverage at first, with greater coverage as plants grow. Cost: low to moderate depending on frame and plant choice. Best use: vertical spaces and decorative boundaries. Upkeep: training, pruning, and structural checks.
Recycled materials
Speed: immediate if the materials are ready to use. Cost: potentially low, but repairs and fasteners still count. Best use: short screens and small projects. Upkeep: inspect for rot, corrosion, and loose parts.
Furniture rearrangement
Speed: immediate. Cost: usually free. Best use: seating areas and small patios. Upkeep: little, though the layout may need seasonal adjustment.
Which Option Gives the Most Privacy for the Money?
For an immediate improvement around one chair or table, rearranging furniture or using a small screen is often the simplest place to start. If you already own suitable containers, grouping them with plants may provide a similar benefit without building a structure. For a longer boundary, a mixed planting can be useful when you can wait for growth.
For a second-story view, consider the height and angle of the sightline before choosing a low fence or short hedge. A small overhead screen or a combination of carefully placed elements may be more effective, provided the structure is allowed and properly supported. Do not assume that one inexpensive barrier will block every view.
Need privacy today
Start with furniture placement, a stable screen, or an appropriate curtain system.
Want a natural look
Use locally suitable shrubs, grasses, containers, or climbing plants.
Need to cover a long boundary
Compare a permitted fence repair, selective fence panels, and layered planting before committing to the full length.
Have a very small budget
Reuse safe materials and solve the most important sightline first.
9. Plan Privacy Projects Around Weather and Local Rules
A privacy project should suit the conditions in your yard and comply with local requirements. Fence height, placement, permits, property boundaries, and rules for front or side yards can vary by city, county, and homeowners association. Check the rules that apply to your property before building a fence, attaching a permanent screen, or installing a tall structure.
Wind matters even when a screen looks light. Solid panels, curtains, and dense vine-covered trellises can catch strong gusts. Use supports designed for the structure and location, and do not place an unstable panel where it could fall on people, windows, vehicles, or neighboring property.
Before digging holes for posts or planting large shrubs, contact the appropriate underground utility-locating service. In the United States, 811 can help arrange the marking of covered underground utility lines before digging. Follow the instructions for your state and utility providers, and keep digging within the cleared area and any required safety limits.
Plants also need room to grow without harming nearby features. Keep shrubs clear of air-conditioning equipment, utility meters, vents, and access panels. Avoid blocking storm drains or creating a spot where water collects against a foundation. If a proposed structure attaches to a deck, retaining wall, or other load-bearing element, seek qualified help if you are unsure whether it can safely carry the added load.
Source: outdoorfuse.com
Check local restrictions
Confirm height limits, setbacks, permits, and any homeowners association requirements before construction.
Mark underground utilities
Contact 811 before digging and follow all local instructions for utility marking.
Account for wind
Use stable supports and appropriate anchors, and secure or remove temporary screens when weather conditions require it.
Protect access and drainage
Keep doors, gates, walkways, drains, meters, vents, and service areas clear.
Avoid Common Backyard Privacy Mistakes
One common mistake is choosing the tallest possible barrier without considering the yard's size or local rules. A bulky wall can make a small space feel closed in, shade a garden, or create problems with wind. A shorter screen placed at the right angle may achieve the same goal with less material.
Another mistake is planting too close to a fence. Roots, branches, and mature plant width can complicate maintenance and may put pressure on weak structures. Read the mature-size information and leave room to prune both the plant and the fence.
Do not expect a new hedge to create a complete visual barrier immediately. If you need privacy this season, combine young plants with a temporary screen. Check the view after installation and adjust the placement instead of assuming that more height or more plants will automatically fix the problem.
Buying before measuring
Measure the exposed area and sightline first so you do not buy too many panels, plants, or containers.
Ignoring mature plant size
Allow space for roots, branches, airflow, and access for maintenance.
Using weak supports
Do not rely on loose pots, flimsy brackets, or damaged fence boards to support a tall screen.
Blocking every opening
Preserve safe exits, ventilation, visibility near vehicle access, and access to utility equipment.
10. Follow a Simple Weekend Privacy Plan
You can make a useful start in a weekend without tackling every boundary. Begin by identifying the exposed area, then test a new furniture layout. If the view remains a problem, choose one targeted screen, curtain, or group of planters and install it safely.
For a longer-term plan, combine a quick fix with suitable plants. The screen can provide immediate privacy while shrubs, grasses, or vines grow. Over time, you can decide whether you still need the temporary barrier or whether the planting now does enough of the work.
Source: artofit.org
Step 1: Inspect
Check the yard from your usual seating spot and identify the views you want to block.
Step 2: Measure
Record the width, height, and direction of the exposed area, along with any nearby paths, doors, or utilities.
Step 3: Reuse
Move existing furniture and planters into place. Test whether a small layout change solves part of the problem.
Step 4: Choose one upgrade
Select a stable screen, a permitted trellis, outdoor curtains, or plants that suit the conditions.
Step 5: Check the result
View the space from several angles and make sure the barrier does not obstruct safe access or drainage.
Step 6: Maintain
Inspect supports, repair damaged materials, water new plants as needed, and adjust the layout as plants mature.
A Sample Budget for a Small Seating Area
Consider a hypothetical homeowner who wants more privacy around a small patio but cannot afford a new fence. The first step is free: move the table away from the most exposed boundary and turn the chairs toward the garden. The homeowner then reuses two suitable planters and places them beside the open side of the seating area.
If the remaining view is still distracting, the homeowner can price one small screen or a suitable trellis. A locally adapted shrub can be added later if the space, light, and budget allow. This staged approach avoids paying for a long fence when only one corner needs coverage.
There is no single price that fits every American backyard. Lumber, containers, plants, fasteners, and delivery costs vary by region and season. Ask for local prices, compare material sizes, and decide which part of the project provides the most useful privacy before committing to the next step.
Start at no cost
Rearrange furniture and use existing containers before shopping.
Buy only what is missing
Add one targeted screen or a few suitable plants rather than replacing the whole boundary.
Expand when needed
Review the results after using the space and make the next improvement only if a clear gap remains.
11. What to Do When Your First Privacy Fix Does Not Work
If the yard still feels exposed after installing a screen or moving furniture, check the view again before spending more. The problem may be a gap at the side, an elevated window, or an angle you did not account for at first. A small change in position can sometimes close that gap without adding another barrier.
If a screen blocks the view but makes the patio dark or cramped, consider a slatted panel, a partial screen, or a plant arrangement that leaves the upper part open. If a hedge grows slowly, check sunlight, water, soil drainage, and plant suitability before replacing it. Poor growing conditions may be the cause rather than the plant's size at purchase.
If the structure moves in wind, stop using it until the support issue is fixed. If a fence leans, posts rot, or a panel pulls away from its anchors, repair the underlying problem rather than covering it with another layer. For substantial structural repairs or uncertain load-bearing connections, seek a qualified contractor.
Source: mightypaint.com
You can still see through a gap
Adjust the angle or position, then add a small panel or container where the gap remains.
The area feels too enclosed
Reduce the screened width, use an open slat design, or keep the barrier beside the seating rather than around it.
Plants are not filling in
Check light, watering, drainage, mature size, and climate suitability before adding more plants.
The screen shifts or leans
Stop using it and correct the base or anchoring. Replace damaged parts instead of relying on improvised supports.
Judge Privacy From the Right Place
Privacy is about the view from the places you use, not just how the yard looks from the street. Sit in the main chair, stand at the grill, and look toward the exposed windows. A barrier that seems tall enough while standing may leave your head and shoulders visible when seated, or the reverse may be true.
Repeat the check at the time of day when you use the yard most. Sunlight, shadows, and plant density can change the sense of exposure. Make small adjustments first, then decide whether a more substantial improvement is worth the cost.
Check seated and standing views
Test the actual sightlines that matter to your daily use.
Review seasonal changes
Account for deciduous plants that lose leaves and annuals that die back.
Reassess after installation
Confirm that the barrier blocks the intended view without creating new safety or access problems.
12. Research Notes and Next-Question Gap Map
This guide focuses on practical, low-cost privacy methods, including screens, plants, trellises, curtains, recycled materials, and furniture placement. The recommendations are based on general landscaping and home-project principles rather than a hands-on test of specific products or a current survey of retail prices.
The following next-question map separates practical needs inferred from the task from verified search observations. No live search-query dataset, Search Console report, or competitor-page audit is claimed here. Questions are included because they affect the reader's choice and safe completion of a privacy project, not because search volume or competitor omissions have been established.
Question: How can I block a neighbor's second-story view?
Reader stage: planning. Basis: inferred next need from the problem of elevated sightlines. Competitor coverage: not checked. Reader benefit: helps select the correct screen height and angle. Evidence needed for a specific project: site measurements, local structure rules, and support requirements. Priority: high. Placement: planning and comparison sections.
Question: Which privacy plants grow well in my region?
Reader stage: plant selection. Basis: inferred next need from climate-dependent growth. Competitor coverage: not checked. Reader benefit: reduces the chance of buying unsuitable plants. Evidence needed: local climate, sunlight, soil, moisture, and mature plant size. Priority: high. Placement: plant selection section.
Question: Can I build a cheap privacy fence without a permit?
Reader stage: before construction. Basis: inferred next need from fence and screen installation. Competitor coverage: not checked. Reader benefit: helps prevent costly rule violations. Evidence needed: applicable city or county code, property rules, and any homeowners association requirements. Priority: high. Placement: safety and local rules section.
Question: How can I make a rental backyard more private without permanent changes?
Reader stage: choosing a method. Basis: inferred next need from limits on permanent alterations. Competitor coverage: not checked. Reader benefit: identifies movable and removable options. Evidence needed: lease terms, property rules, and the stability of the chosen setup. Priority: medium. Placement: screening and furniture sections.
Question: How much will a small privacy project cost?
Reader stage: budgeting. Basis: inferred next need from the low-cost requirement. Competitor coverage: not checked. Reader benefit: encourages comparison of complete project costs instead of material prices alone. Evidence needed: current local prices, dimensions, delivery, fasteners, and maintenance costs. Priority: high. Placement: budget and comparison sections.
Frequently Asked Questions
Q
What is the cheapest way to make a backyard more private?
Start by moving chairs, tables, and existing planters to block the most exposed view. This costs nothing if you already have suitable items. If you still need coverage, a small DIY screen or a short row of containers may solve the problem for less than a full fence.
Q
How can I make my backyard private without a fence?
Use freestanding screens, outdoor curtains on a suitable covered structure, trellises, climbing plants, shrubs, or container gardens. Furniture placement can also improve privacy around a patio. Combine methods when one item cannot block the full sightline, and make sure every structure has suitable support.
Q
What plants make a good low-cost privacy screen?
Suitable evergreen shrubs, ornamental grasses, compact hedging plants, and climbing plants can all provide screening. The best choices depend on your USDA hardiness zone, sunlight, soil, rainfall, and available space. Check mature height and width, and avoid invasive species or plants that cannot tolerate your local conditions.
Q
How can I get backyard privacy quickly while plants grow?
Install a stable temporary screen, rearrange furniture, or use an appropriate curtain system while your plants establish. A small panel beside the seating area can provide useful coverage without enclosing the whole yard. Check wind exposure and support requirements before using a temporary barrier.
Q
How do I make a small backyard feel more private without making it look smaller?
Focus screening on the seating area rather than the full boundary. Use narrow-growing plants, open slat screens, or a trellis to preserve light and airflow. Arrange furniture toward an attractive focal point, and leave open space around paths and the center of the yard.
Q
Can I use pallets to make a cheap backyard privacy screen?
You may be able to reuse a pallet if its wood is sound, its treatment and history are suitable, and the finished screen can be supported safely. Avoid pallets with chemical spills, unknown contamination, serious decay, or unsafe fasteners. A pallet is not automatically suitable for outdoor reuse, and a tall pallet screen must be secured against tipping and wind.
Q
Do I need permission to install a backyard privacy screen?
Requirements vary by location and by the size, placement, and permanence of the structure. Check local fence and building rules, property boundaries, and any homeowners association restrictions before installing a tall or permanent screen. For a rental property, review the lease and obtain the owner's approval when required.
✦ Wrapping Up
Conclusion
Making a backyard more private does not have to mean building an expensive fence. A better furniture layout, a few well-placed containers, a small DIY screen, or a suitable trellis can make an exposed patio feel more comfortable. Plants can add longer-term coverage and soften the look of the yard as they grow.
The best approach is to solve one sightline at a time. Measure the area, use what you already own, and compare the full cost of each option before buying materials. Choose plants and structures that suit your climate, available space, and local rules, and never trade stability or safe access for a lower price.
Start with the simplest change that could work. Rearrange your seating, test the view, and add one targeted screen or planting area if needed. You can build on that first improvement later, creating a more private backyard in stages while keeping spending under control.
💡 Key Takeaway
This weekend, identify the single most exposed spot in your backyard, measure the view you want to block, and try rearranging your existing furniture or planters. If privacy is still lacking, compare one stable screen with a small planting plan before spending money on a full fence.



No comments:
Post a Comment